Folding Trekking Poles

FREE shipping on all U.S. orders over $90!
Go the Extra Distance and Move Faster, All While Exerting Less Energy!

Introducing Foxelli Folding Trekking Poles that are specially designed for performance, maximum comfort and safety.

Foxelli Trekking Poles Meet All Your Hiking Needs, with its Adjustable Quick Lock Technology, Ultra-Light Design and Shock-Absorbent Materials.
  • Easily and quickly adjust poles' length to fit adults or children
  • Heavy duty fast locks make sure you stay safe on steep hikes
  • Increase traction, maintain balance and minimize impact on legs, knees, ankles and feet
  • Foxelli Poles offer ultimate comfort, durability and versatility under all trekking conditions for years to come

Specifications:
  • Easily packable (14.6 inches when folded)
  • Lightweight (only 11.6 oz. each)
  • Made of super tough 7075 aluminum
  • Easy to use quick-locks
  • Adjustable height 45” to 53.5”
  • Anti-slip natural cork grips for ultimate comfort
  • Extended EVA foam sleeves
  • Padded, adjustable wrist straps
  • Tungsten carbide tips for better traction
  • Included accessories for all terrains and all 4 seasons

We Offer The Fastest Shipping & Hassle Free Returns!

Shipping Information:

  • FREE Standard Shipping for all USA Orders Over $90!
  • Most US based orders are shipped directly from our warehouse within 24-48 hours for your convenience and maximum efficiency.
  • Your product will arrive within 4 to 10 Business Days.

 Returns Information:

  • We offer a 100% Satisfaction guarantee or your money back. Please contact us at help@foxelli.com for return requests.

Trekking Poles

Q: How to properly adjust the length of the poles?
A:

  1. Open both fliplock tabs. Pull out the MIDDLE and BOTTOM sections of your poles and adjust them to the proper height markings. Adjust both sections to the SAME number.
  2. KEEP THE FLIP LOCK LEVERS OPEN AT THIS POINT!
    Tighten the screws by turning them a few ¼ to ½ turns clockwise. You‘re not supposed to tighten them all the way. What you are doing is adjusting the tension on the clamp.
  3. Close the fliplock tabs. You should feel a bit of resistance or difficulty when closing the tabs, and hear them snapping into place. If there‘s too much resistance and you can‘t even close the tabs, the screws were over-tightened in the previous step. Open the lever, loosen the screws a bit, and close. How to know if you got it right? See the next step.
  4. Test and re-adjust. Confirm that the locks are fully secure by leaning forward and putting your full body weight on the poles. Check that there is no shift in height. If the poles slide down even slightly, open the lever, tighten the screws, and close. Repeat until the poles no longer collapse.

REMEMBER: ADJUST THE SCREWS FIRST, THEN CLOSE THE LEVER CLAMP. This is where many people get it wrong. If you do it the other way around, the poles will surely slide down and pose a safety risk.

Q: How to adjust the wrist straps?
A: Just simply pull out the plug so you can easily adjust the straps using the sliding adjustment clip. Take a look at the pictures down below for clearer instructions.


 1. Pull out the ends                          2. Adjust the length                         3. Pull back inside

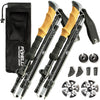
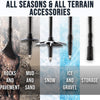
Q: What is the purpose of each accessory and how are they supposed to be used?
A: The naked metal tips are perfect for hikes on gravel and ice. If used excessively, eventually they will wear off, therefore, we recommend using the provided accessories on all other terrains.

The asphalt tips (the ones that resemble little feet) are the most versatile. They are perfect for hard, flat, or rocky surfaces (rocky terrains, roads, paths, etc.). These tips are perfect to use on a daily basis.

The storage tips are meant to be used for storing and for traveling. While used, the semi-sharp naked carbide tips are not going to be exposed, therefore, it makes them safer to store in your house or anywhere else.

The mud baskets prevent poles from slipping into the soft ground when hiking in mud, sand, or other soft surfaces.

The snow baskets prevent poles from sinking into the snow.

The tips should be simply put on the carbide tips of the poles, however, mud and snow baskets are supposed to be screwed onto the threads found at the bottom of your poles. Please make sure to screw them on tightly and give them a tug before hiking to prevent loss on trails.


Q: Can you use trekking poles without the extra tips?
A: Yes, the naked carbide tips are the best for ice and gravel, however, we do not recommend not using any extra tips for extended periods of time, because carbide tips will start wearing out if unprotected.